Cinnamon Bun Smoothie

Cinnamon Bun Smoothie RecipeI make this Smoothie all the time! It’s a super easy morning treat for those of us that aren’t really big breakfast eaters or else don’t have much time in the mornings to prepare a grand feast! lol ~  The banana and almond milk make this smoothie have a very light & creamy texture that is just as delicious (and evil!) as that smoothie you love from the cafe – Just minus all those extra calories!  (So of course you love me now, right!?) lol 😉

Ingredients:

1 frozen banana, cut into pieces
1 cup unsweetened almond milk

1/2 teaspoon ground cinnamon
1/4 teaspoon vanilla extract
1/2 teaspoon pure maple syrup
Cinnamon stick, for garnish

Directions:

  1. Combine all ingredients in a blender. Blend until smooth, and add more almond milk if necessary.
  2. Pour into a tall glass, add the cinnamon stick for garnish and attractiveness 😉 & drink up!

Bon Appètit!

Makes one serving

https://i0.wp.com/media1.onsugar.com/files/2013/03/10/1/192/1922729/9fed84dee8a20c89_nutritional-info.xxxlarge.jpg

Baked Fall Apples

h..

Here’s a yummy little fall treat for you to try! Perfect by themselves as a breakfast dish, try serving these at your next brunch!  You can also serve with vanilla ice cream for dessert. 😉

Ingredients:

  • 6 baking Apples (such as Cortland, Empire, Gala, Braeburn, or Pippin)
  • 1 & 1/2 cup Oats
  • 1/2 tsp, Cinnamon
  • 1/2 tsp. Nutmeg
  • 1/2 cup chopped candied or plain Nuts (i used walnuts & almonds)
  • 1/3 cup light or dark brown Sugar
  • 1/2 cup dried Cranberry’s, cherry’s, or blueberry’s
  • 2 tablespoons Butter, cut into small pieces
  1. Heat oven to 400° F. Remove and discard the cores from the apples. Place the apples in a 9- by-13-inch baking dish.
  2. In a small bowl, combine the oats, spices, nuts, dried fruit, sugar and butter. Divide the mixture among the apples. (You can cover and refrigerate for up to 24 hours.) Bake covered until tender, about 25 minutes.

Tip from the test kitchen:  I’ve made these Apples using other settings as well and i really like how they turned out!*

*All I did was set my oven to 350° F  and then baked the apples, covered, for around 50 minuets instead. My thinking here is that it gives the apples more time to slowly release that juiciness and flavor into the mixture, and I’ve found that the apples i’ve made this way are extra soft and tender.

            ♥Leave me a comment below to let me know which way you decided to try these & how you liked it! ♥

Happy Baking & Bon Appètit!

Mango Pina Colada Smoothie

.jpg~Afternoon Everybody~  My mother and i decided to change things up a bit this morning & make a smoothie more on the tropical side of things! It is so fresh tasting and decadently delicious! I hope you all enjoy! 🙂

Ingredients:

  • 1 Mango, peeled, sliced & cubed
  • 1 1/4 cup Ice Cubes
  • 2 teaspoons Sugar (or agave nectar)
  • 1 1/4 cup Pineapple Juice
  • 1/2 cup heavy Cream
  • 1 (14 ounce) can Coconut Milk

Directions: Place the mango cubes, ice, sugar, pineapple juice, cream, and coconut milk into a blender. Puree until smooth, pour into glasses and serve.

“Deathly Dark” Chocolate Pudding

... Good Morning Everybody!

I was in a very creative mood about two weeks ago (sorry it’s taken me so long to blog about it! lol)….but anyways! – I wanted to try making something super easy, so i went looking for a recipe that fit my mood…i guess that was pudding!? (random huh? lol) Anyways! I compared around 8 different recipes and finally decided to take an element from each recipe and combined/mix ingredients till i got the right constancy and taste. So i’ve made this pudding literally like 5 times with-in the past  2 weeks! 😉 …..every time i make a new batch i find out the next morning that it’s all gone! The kids just devourer it! So here is the resulting recipe of my crazy experiment! Hope ya’ll like it!

Ingredients:

  • 2 cups Milk
  • 3/4 cup Sugar
  • 1/3 cup Hershey’s Cocoa Powder
  • Pinch of Salt
  • 2-3 Tbs. Cornstarch (the amount sometimes varies depending on the day idk why! lol)
  • 1 teaspoon Vanilla

Directions: In a medium size sauce pan, whisk in the Sugar, Cocoa Powder, Salt, & 1 cup Milk; Heat over a medium flame & stir mixture often so as not to burn it. Once the temperature is just under boiling, sift in the cornstarch and then add the other 1 cup of milk then the Vanilla. Stir to get rid of any lumps. Let the mixture almost reach boiling point – this is when it really starts to thicken, so make sure you stir it consistently. Once the mixture reaches your preferred thickness, pour into a glass dish and place into the fridge to cool. (unless you like to serve it right away! 😉 ) Then just serve when your ready!

(Hint #1: Vanilla Ice Cream is awesome scooped on top for when served warm…but you didn’t hear me say that! lol)

(Hint #2: For an extra chocolate kick i like melting about 1/2 cup of chocolate chips into the mixture by pouring them in after the cornstarch has been fully dissolved!)

~ I’m sure you’ll all hate me now because you want to make this 😉 … so i’m going to sign off now (Mawhahahahaha! lol) ~

Bon Appétit!

Magic Cookie Bars

....

Greetings everybody! So sorry for the lack of posts lately…holidays, birthdays, weddings and graduations all come flooding in around this time of year, & thing have gotten kinda’ crazy because of that! 😉

This recipe is great because it’s not too time consuming, and for the most part, you *should* already have everything you need for them in your cupboard! Perfect for bringing to that summer event you are invited to at just the last minuet!  Hope you Enjoy!  🙂

Ingredients:

  • 1 & 1/2 cups graham cracker crumbs
  • 1/2 cup margarine (melted)
  • 1 cup chopped walnuts
  • 3/4 cup semisweet chocolate chips
  • 3/4 cup butterscotch chips
  • 1 & 1/2 cups flaked coconut
  • 1 & 1/3 cups sweetened condensed milk

Directions:

  1. Preheat oven to 350 degrees F (175 degrees C).
  2. In a 9 x 13 inch pan pour in melted margarine. Sprinkle the graham cracker crumbs evenly over the margarine. Next place the chopped nuts over the crumbs, and spread the chocolate and butterscotch chips over the nuts. Add the coconut over all, and pour the milk evenly over the top.
  3. Bake 25 to 30 minutes or until lightly brown on top. Cool at least 20 minutes then cut into desired sized bars.

Bon Appétit!

Recipe & Photo Credit

Green Smoothie

...Hi Everybody! Sorry for the lack of post lately…been having a bad time of it with my internet access 😦 hopefully things will be back to normal soon, but until then – enjoy this smoothie recipe! 🙂

Refreshing and totally yummy – all while being healthy for you! Just don’t freak out at the strange green color…you’ll get used to it! lol

Ingredients:

  • 1 whole Kiwi, Peeled And Sliced
  • 1 whole Ripe Mango, Chopped And Frozen
  • 1-½ cup Lifeway Coconut Chia Kefir (or Almond Milk Or Greek Yogurt)
  • ½ whole Frozen Banana, Sliced
  • 1-½ cup Fresh Spinach

Directions:

Blend all ingredients in a blender (i use a Magic Bullet) until smooth and then serve immediately.

Optional extras to add: Chia seeds, Coconut, or Protein Powder.

Bon Appètit!

TeaTime Raspberry Thumbprint Cookies

Hi Everybody,

A few evenings ago it was raining and stormy outside, making it a rather dreary evening inside as well, so i decided to try making these lovely little cookies to cheer me up and to my delight, they came out splendidly! I hope you all enjoy this recipe! 🙂

Ingredients:

  • 1-½ cup Butter, Room Temperature
  • 1 cup Sugar
  • 1  Egg
  • 1 teaspoon Vanilla
  • ½ teaspoons Salt
  • 3-¼ cups Flour
  • ¾ cups Jam (any Kind)

Preparation Instructions:

Preheat the oven to 350ºF.

Cream the butter and sugar together until light and fluffy, about 3 minutes. Add the egg, then vanilla and salt, mixing well. With the mixer on low speed, slowly add the flour and mix until it just comes together.

Roll the dough into small balls(which may be a little difficult) then place on a lined baking sheet a few inches apart (cookies will spread). If the dough is hard to work with, refrigerate it for 30 minutes.

Using the back of a utensil, or your thumb, create a hollow in each cookie for the jam. Fill with jam. (but don’t over-do it! this is a less-is-more type of thing)

Bake for 18 to 20 minutes; the edges will be set, but the cookies should not be browned at all, and will not look done. Let the cookies cool for 1 minute on the sheet before moving them to a cooling rack.

If desired, fill with more jam and enjoy your cookies with a nice glass of milk or sweet cup of tea.

Bon Appètit!

Chewy Chocolate Caramel Bars

...

These gooey bars of chocolaty goodness are a lovely change to an ordinary brownie recipe. Make sure to follow the directions closely and you will end-up with a very special treat! :)“This is my invariable advice to people: Learn how to cook- try new recipes, learn from your mistakes, be fearless, and above all have fun!”
― Julia Child, My Life in France

Prep Time: 10 minutes

Cook Time: 25 minutes

Total Time: 1 hour, 30 minutes

Yield: one 13X9″ baking pan

 Ingredients:

  • 2 cups (240 grams) all-purpose flour
  • 1/4 cup (56 grams) diced cold butter
  • 1 1/2 cups (300 grams) sugar
  • 1 cup (80 grams) cocoa
  • 2 teaspoons baking powder
  • 1 teaspoon baking soda
  • 1/2 teaspoon salt
  • 3/4 cup (168 grams) melted butter
  • 5 oz (1 small) can evaporated milk
  • 14 oz caramels, unwrapped
  • 1 1/2 cups (226 grams) semi-sweet chocolate chips
  • 12-14 extra caramels

Directions:

  1. Heat the oven to 350F.
  2. Line a 13X9 baking pan with parchment paper. Set aside.
  3. In a food processor add the flour and cold diced butter. Pulse a few more times until the mixture resembles fine breadcrumbs and all the butter is cut in. You can also use a pastry blender, a fork or rub the butter and flour with your hands.
  4. Add the sugar, cocoa, baking powder, baking soda, salt and whisk to combine.
  5. In a large mixing bowl add the dry ingredients mix and pout the melted butter on top. Add 1/3 cup of the evaporated milk and mix until well combined. The dough it’s going to be similar to a light crumby cookie dough.
  6. Spread 2/3 of the dough in the prepared baking pan and set aside. Refrigerate the remaining dough until needed.
  7. In a small saucepan place the remaining evaporated milk and the unwrapped caramels. Stir continuously over low heat until the caramels are melted. Pout over the cookie dough base.
  8. Sprinkle the chocolate chips over the caramel layer.
  9. Take the remaining cookie dough out of the fridge and crumble it on top of the chocolate chips.
  10. Top with the remaining caramels.
  11. Bake for 25 minutes.
  12. It may seem bubbly and undone but once cooled the caramel and chocolate layers will set.
  13. Cool completely in the pan before cutting into bars.

Bon Appétit!

Recipe & Photo Credit

Glazed Chewy Oatmeal Raisin Cookies

cookies

Chewy and super yummy – these are the perfect Spring/Summer treat!  🙂

“Spring is the time of plans and projects.”
― Leo Tolstoy,  Anna Karenina

Ingredients:

  • 1 & 1/2 stick Butter, room temperature
  • 1/4 cup Coconut Oil (Or replace the coconut oil by making the recipe with 1/2 lb. Butter total)
  • 1 – 1/4 cups packed Brown Sugar
  • 3/4 cup granulated Sugar
  • 2 Eggs, room temperature
  • 1 teaspoon Vanilla extract
  • 2 cups all-purpose Flour
  • 4 cups rolled Oats
  • 1 teaspoons Baking Soda
  • 1 teaspoon Cinnamon
  • 1/2 teaspoon Nutmeg
  • 1/2 teaspoon Salt
  • 10 oz. bag Cinnamon Chips
  • 1 cup toasted chopped Walnuts
  • 2 cups, soaked & drained Raisins

For the Glaze: Powdered Sugar & Water

Preheat oven to 350 degrees. Line baking sheets with parchment paper; set aside.

Cream together the sugars and butter. Add the vanilla and the eggs one at a time, combining well after each addition.

Combine the flour, oats, baking soda, cinnamon, nutmeg and salt in a separate bowl.

Add the flour mixture to the egg mixture and blend well. Stir in the chips, raisins and nuts.

Using a small ice cream scoop, scoop out onto lined baking sheets.

Bake for about 12-13 minutes and remove from oven to cool on sheet.

Make the glaze by combining powdered sugar and a bit of water to a good drizzle consistency.  Drizzle over cooled cookies and allow the glaze to set up.

Bon Appètit!

Rich Dark Chocolate Espresso Cake

... Morning everybody! 🙂

This is a rich and dreamy Dark Chocolate Cake that i experimented to perfection, shortly after my favorite cake recipe came-up missing a few weeks ago (i still don’t know where it is!)….I gotta’ say though, that this recipe really stepped-right-up to being my new fav!  It’s a super moist cake- using the oil has something to do with that i’m sure, but if you love good cake, then you should go make this! 🙂

Ingredients:

  • 2 cups Sugar
  • 1-3/4 cups all-purpose Flour
  • 3/4 cup HERSHEY’S SPECIAL DARK Cocoa
  • 1-1/2 teaspoons Baking Powder
  • 1-1/2 teaspoons Baking Soda
  • 1 teaspoon Salt
  • 2 Eggs
  • 1 cup Milk
  • 1/2 cup Vegetable Oil
  • 2 teaspoons Vanilla extract
  • 1 cup boiling Espresso or strong Coffee

Directions (cake):

Heat oven to 350°F. Grease and flour two 9-inch round baking pans. (I like to add a round piece of parchment paper to the bottom of my pans but it’s your preference.)

Stir together sugar, flour, cocoa, baking powder, baking soda and salt in large bowl. Add eggs, milk, oil and vanilla; With electric mixer beat on medium speed for 2 minutes. Stir in boiling water (batter will be very thin). Pour into prepared pans.

Bake 30 to 35 minutes or until wooden pick inserted in center comes out clean. Cool 10 minutes; remove from pans to wire racks. Cool completely, then Frost (see recipe below)

———

Note: This frosting is just a very basic staple recipe for you today (My best & favorite recipe for chocolate frosting is with my chocolate cake recipe -which is strangely MIA! So i’ll post that recipe for you as soon as i find it!)

“ESPECIALLY DARK” CHOCOLATE FROSTING

  • 1/2 cup (1 stick) Butter or Margarine
  • 2/3 cup HERSHEY’S SPECIAL DARK Cocoa
  • 3 cups powdered Sugar
  • 1/3 cup Milk
  • 1 teaspoon Vanilla extract

Directions: Melt butter, Stir in cocoa. Alternately add powdered sugar and milk, beating to spreading consistency. Add small amount additional milk, if needed. Stir in vanilla. About 2 cups frosting.

Recipe Credit

The Pioneer Woman~Cinnamon Pull-Apart Bread

Hi Everybody!  My family loves making this sweet bread for brunch or serving it with coffee or tea whenever we have company come over.  It really is a special treat!  I recommend visiting Ree Drummonds original Post of this recipe because she did an amazing tutorial to go with it!  Click> HERE <to go to the original recipe post.  Hope you all enjoy! 🙂

Ingredients: For the Dough

  • 2 cups Whole Milk
  • 1/2 cup Canola Oil
  • 1/2 cup Sugar
  • 2-1/4 teaspoons Active Dry Yeast
  • 4 cups All-purpose Flour
  • 1/2 cup (additional) All-purpose Flour
  • 1/2 teaspoon Baking Powder
  • 1/2 teaspoon Baking Soda
  • 2 teaspoons Salt
  • 1 stick Butter, Melted
  • 1-1/2 cup Sugar
  • 3 Tablespoons Ground Cinnamon

Icing:

  • 3 cups Powdered Sugar
  • 2 Tablespoons Butter, Melted
  • 1 Tablespoon Maple Extract
  • 1/3 cup Whole Milk
  • Dash Of Salt

Directions:

  • To make the dough, combine milk, canola oil, and 1/2 cup sugar in a large saucepan. Heat it until very hot but not boiling. Turn off heat and allow to cool to warm (not at all hot.)
  • Sprinkle in the yeast and add 4 cups of flour. Stir to combine, then put lid on the pot and allow to rise for 1 hour. After 1 hour, stir in additional 1/2 cup flour, along with the baking powder, baking soda, and salt. If dough is overly sticky, stir in another 1/2 cup flour.
  • Place dough in the fridge for at least 1 hour to make it easier to work with.
  • Roll out dough onto a floured surface. Drizzle on melted butter and smear so that it covers all the dough. Mix together the sugar with the cinnamon and sprinkle it all over the surface of the dough. (Dough should look very covered.)
  • Cut the dough into 6 to 8 strips, then stack all the strips into one stack. Cut the stack of strips into 6 slices. Place the stacks sideways into a buttered bread pan. Do not cram the slices into the pan. (You may have a few leftover.)
  • Cover with a dish towel and allow to rise for 20 minutes. Preheat oven to 350 degrees. Place the pan in the oven and bake for 30 minutes, checking at 20 minutes to make sure it’s not getting too brown on top. It’s important to bake the bread long enough to ensure that the middle won’t be too doughy, because if it is it won’t pull apart easily. If the top looks like it’s getting too brown, cover it lightly with aluminum foil for the rest of the baking time. REPEAT: IT’S IMPORTANT TO BAKE THE BREAD LONG ENOUGH FOR THE CENTER TO NO LONGER BE DOUGHY.
  • Remove the pan from the oven when it’s done. Run a knife along the edges and take the bread out of the pan. Mix together the icing ingredients and drizzle over the top, allowing it to sink into the crevices. Serve warm or room temperature!

(Note: You can do a cranberry-orange version with orange marmalade, brown sugar, and dried cranberries!Or you can also add cloves and more cinnamon if you prefer a stronger flavor with raisins! When we make this we also enjoy spreading a cream cheese frosting on top.)

Bon Appètit!

Photo & Recipe credit The Pioneer Woman.com

Ranch Flavored Oyster Crackers

http://ts4.mm.bing.net/th?id=H.4622296299668939&pid=15.1

These crackers are always in high demand at my house, so whenever we make them they are always gone as soon as they are cool enough to eat! 

Ingredients:

  • 1 package of Oyster Crackers
  • 1/2 cup Oil (Vegetable or Olive)
  • 1 Powdered Ranch salad dressing, original flavor
  • 1 tsp. Garlic Power/Salt
  • 1 Tsp. Dill Weed

Directions:

  1. In a large bowl, combine ranch, dill, garlic powder, Dill weed and oil. Stir until well combined.
  2. Add oyster crackers and toss gently until crackers are evenly covered with seasoning.
  3. Spread crackers evenly on a cookie sheet and bake 15-20 minutes or until golden brown. Gently stir about half way through baking.

Bon Appètit!

Easter Nest Cookies

This is a quick, easy, and festive Easter delight! 🙂 Enjoy!

I thought today, instead of a quote I would share a song with you that has encouraged me many times, by Sara Groves. I hope you enjoy it and that your Spirits are lifted and encouraged!

“Add to Beauty” song: http://www.youtube.com/watch?v=yMzsTgaDrQo


monicas pictures 078monicas pictures 052

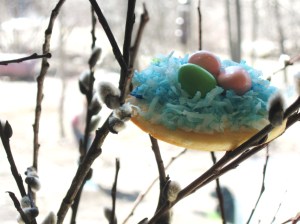
Easter Nest Cookies

Make sugar cut out cookies and let cool. Frost cookies. Add coconut to a 1-quart resealable plastic bags. Add 2-3 drops of food coloring in each bag, shaking each bag to blend color. I may be necessary to add 1-2 tsp. water to help disperse the color evenly or additional food color until desired color is reached. Sprinkle about a couple tsp. of coconut onto each cookie. Top with three chocolate eggs.

Nesting Chicks

Happy Easter! Welcome to Sweet 16’s Country Kitchen~

I was looking for some new treats to make for Easter this year, and my mom handed me this recipe, I knew I had to try it! So, today in preparation for tomorrow, made them! Here is what I found: They are super easy, really cute, and, just plain fun to make! 🙂 Enjoy!

“God says to His children: Are you lonesome?… Come to Me and I will be your friend. Are you sick? Come to Me for healing. Are you left out of things? Feeling rejected and pushed aside? Come to Me.” ~Alice Chapin

“Lift up your eyes. Your heavenly Father waits to bless you—in inconceivable ways to make your life what you never dreamed it could be.”~Anne Ortlund

Nesting Chicks

  • 1 package (10.5 oz.) miniature marshmallows
  • 2 TBSP. butter
  • 1 TBSP. water
  • 1 tsp. water
  • 4 drops of green food coloring (or any other color you desire)
  • 1 1/2 cups flaked coconut
  • 6 cups Corn Pops cereal
  • 1/2 cup jelly beans
  • 16 peeps

“Glue” (to keep chicks and jelly beans on nests)

  • Confectioners sugar
  • milk

-(Mix in enough of each until a thick frosting is achieved)

In a large saucepan, combine marshmallows and butter. Cook and stir over low heat until melted and smooth. Meanwhile, divide the coconut into three different small resealable bags, add desired food coloring to each bag and drip some water in each bag. Seal bag and shake to tint. Set aside. Place the cereal in a large bowl; add marshmallow mixture and stir until combined. (Spray fingertips with cooking spray to keep them from sticking to the mixture while handling) Press into greased muffin cups. Remove nests from cups; top with tinted coconut, frost bottom of peeps and stick to nests, do the same with each jelly bean you add.

Yield: 16

Yorkshire Teacakes

https://sweetsixteenscountrykitchen.files.wordpress.com/2013/03/teacakes01framed.jpg

 Happy Easter Everybody! 
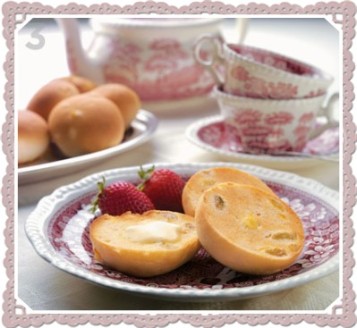
Yorkshire Teacakes are on the list of my “favorite things” so i thought I’d let you in on the recipe, so you can enjoy them too!  These fruit-filled tea-time treats are thought to be a refinement of the original medieval Manchét or “handbread” – a hand-shaped loaf made without a pan.  Serve them split & buttered, either warm from the oven or toasted.

Ingredients:

  • 1 & 1/4  cups Milk (plus extra for glazing)
  • 4 cups Flour
  • 1 teaspoon Salt
  • 3 tablespoons Sugar
  • 3 tablespoons Butter
  • 1 teaspoon rapid-rise Yeast
  • 1/4 cup Currants
  • 1/3 cup Raisins

Directions:

  1. Pour the milk into the bread machine pan. If the instructions for your machine specify that the yeast is to be placed in the pan first, then simply reverse the order in which you add the liquid and dry ingredients.
  2. Sprinkle the flour over, ensuring that it covers the milk completely. Add the salt, sugar and butter, placing them in separate corners of the bread machine pan. Make a shallow indention in the center of the flour (but do not go down as far as the liquid) and add the yeast.
  3. Set the bread Machine to the dough setting; use basic raisin dough setting (if available). Press Start. Add the currents and golden raisins when the machine beeps. If your machine does not have this facility, simply add the dried fruits 5 minutes before the end of the kneading period ends.
  4. Lightly grease two baking sheets. When the dough cycle has finished, remove the dough from the machine & place it on a lightly floured surface. Punch it down gently.
  5. Divide the dough into eight or ten portions, (depending on how large you like your Yorkshire Teacakes) and shape into balls. Flatten out each ball into a disk about 1/2 inch thick.
  6. Place the disks on the prepared baking sheets, about 1 inch apart. Cover them with oiled plastic wrap & set aside in a warm place for 30-45 minutes, or until they are almost doubled in size. Meanwhile, preheat your oven to 400 degrees(F)
  7. Bush the tops of each teacake with milk, then bake for 15-18 minutes, or until golden. Place onto a wire rack to cool slightly.
  8. To serve, split open while still warm & spread with butter, or let the teacakes cool, then split and toast them before adding butter. 

Cooks Tip: If you forget to add the fruit when making the dough, don’t worry. Just knead it in when you punch down the dough before shaping it.

Happy Baking & Bon Appétit!

Recipe from the book: Bread Machine: How to prepare and bake the perfect loaf by Jennie Shapter